

Homemade Chocolate Pop Tarts A Delicious Breakfast Treat
If you have ever tried pop tarts, you know how great and easy to pick up when running out the door. But if you prefer making them yourself, I have gotten you covered with this homemade chocolate pop tarts recipe!
If you have ever tried pop-tarts you know they are a staple in the USA and also well known around the world. This delicious pre-cooked breakfast is easy to pop in the toast and have it beside milk or have it cold when you are running late.
They quickly became a staple of modern times when they made their appearance in the market in the mid 60s. I have only tasted the classics, so when I found Sugar Spun Run recipe, I knew I had to try it!

What are pop-tarts? When were they invented?
Pop-tarts are a kind of rectangular toaster pastry filled with different flavours. Made of two layers of rectangular pastry crust, sandwiched together and filled with anything from chocolate to strawberry or cinnamon and covered in frosting and sprinkles. (Wikipedia)
They can be either toasted or eaten as they are and were marketed as a convenient breakfast thanks to their packaging, no refrigeration needed, being pre-cooked and making breakfast a much quicker meal.
Pop-tarts were invented and distributed by Kellogg’s in 1964. They first went on the market with only four flavours – strawberry, blueberry, brown sugar cinnamon and apple currant- and went nationwide in 1965. Only in 1967, pop-tarts added their traditional frosting and sprinkles. Nowadays, pop-tart flavors change quite often, keeping some classics like strawberry pop-tarts or chocolate fudge pop-tarts and adding seasonal ones as well as limited editions. (Pop-Tarts)
What ingredients do I need to make these homemade chocolate pop tarts?
These chocolate pop tarts require a lot of steps and different ingredients, but you can rest assured that they will get easier with time and that you will taste how good baked chocolate pop tarts are:
- For the pastry dough you will need: purpose flour, cocoa powder, sugar, salt, unsalted butter and sour cream;
- For the filling you will need: chocolate chips, salted butter, heavy cream, vanilla extract and powdered sugar;
- For the egg wash you will need an egg and water;
- For the glaze, you will need powdered sugar, cocoa powder, milk, honey, vanilla extract and sprinkles.


Can I substitute anything in these chocolate pop tarts?
You absolutely can! You can substitute the following:
- sour cream: instead you can use full-fat greek yoghurt or natural yoghurt;
- chocolate chips: instead you can use a bar of chocolate, just cut it into pieces. We used milk chocolate chips, but you can also use dark or semi-sweet ones or white chocolate chips;
- heavy cream: instead you can use half and half with an add-on of butter – which is a mix of heavy cream and milk, coconut milk or milk and butter;
- egg wash: instead you can use milk or plant-based milk. You will need it both to attach the two pastry dough rectangles as well as the top, so it might look less shiny on the exterior;
- vanilla extract: instead you can use vanilla paste or another extract like maple extract or vanilla powder;
- honey: instead you can use corn syrup – which will add more shine to your pop tarts and get a firmer glaze, golden syrup or maple syrup;
- powdered sugar: instead you can use dry milk powder;
- milk: we used regular cow’s milk, but you can substitute it easily for any plant-based one.
What equipment will I need for this recipe?
All you will need for this chocolate pop tarts recipes is a standing mixer to make your pastry dough, some mixing bowls, a cooking brush, a fork and a spatula. Then some parchment paper and cling film.
How do I make the chocolate pop tarts?
In the bowl of your standing mixer fitted with a dough hook attachment, combine the flour, cocoa powder, sugar, and salt. Proceed by incorporating cubes of cold from the fridge butter into the mixture until a crumbly consistency is achieved. Finally, add the sour cream and knead the pastry dough until it begins to cohesively come together.
Once the dough is prepared, flatten it into a disc shape, wrap it with cling film and place it in the refrigerator for an hour. This step is essential to ensure the dough turns out crispy when baked.
In the meantime, get the filling ready. Heat the butter, chocolate, and cream in a microwave-safe mixing bowl until smooth. Mix in the vanilla, salt and powdered sugar, combining all ingredients. Set aside the mixture to cool and thicken.
When the pastry is done chilling, preheat the oven to 200C and line a tray with parchment paper or a baking mat.
On a floured surface, roll out the dough to a thickness of 3 mm, then cut out rectangles measuring 6×10 cm and arrange half of them on the baking sheet. Prepare the egg wash by whisking together an egg and water, then brush this wash onto the surface of the rectangles on the baking sheet. You can now place a spoonful of the prepared filling in the centre of each rectangle.
Top them up with the remaining rectangles and with the help of a fork, seal the two pieces together, then brush again with the egg wash. With a toothpick or knife tip, poke 8 holes in the surface of each pop tart.
Keep assembling them until you finish all your pastry dough. When ready, bake them for 15 minutes, then let them cool completely on a cooling rack.
While the pop tarts are baking, combine sugar, cocoa powder, milk, honey and vanilla in a mixing bowl to create the icing. Ensure the consistency is neither too runny nor thick by observing how it drips from a spoon.
After completely cooling down the tarts, add a spoonful of icing on each of them, cover them up with sprinkles or your favourite toppings and let them harden before serving. Enjoy!

Can I change the fillings or toppings in these pop tarts?
These chocolate pop tarts can be the perfect base for plenty of different toppings or add on, for example:
- nuts: chop some nuts like hazelnuts or walnuts to add inside with your chocolate filling;
- dried fruits: slice finely some dried grapes, oranges or peaches to add a kick to your filling;
- toppings: add some mini marshmallows or different sprinkles you like. Or change the kind of frosting you use on them, like a strawberry one or brown sugar cinnamon.
How to serve the homemade chocolate pop tarts?
These chocolate pop tarts are perfect on their own, but you can also spice it up a bit if you fancy. You can have them with:
- with milk on the side: whether it’s chocolate milk or any other milk you like, these pop tarts are perfect to dip in for a quick snack or delicious breakfast;
- with ice cream: they can work a treat with a dollop of ice cream or if you are even fancier, ice cream sandwiches!;
- with a milkshake: they can be the perfect topping for a milkshake or break it in pieces and add it to the mix;
- for s’mores: just get a marshmallow and break your pop tart ion half for a delicious camping snack;
- cold or hot : these are perfect to have cold or hot, pop them in the oven or microwave to have them just a bit toastier
Can I reheat the chocolate pop tarts?
You can indeed! We don’t recommend toasting them as the icing would most probably melt and create chaos, so we recommend popping them in the microwave or in the oven. Just microwave them for 10 seconds or more depending on how you like them.
Although you can have them warmed up, they are completely fine cold or room temperature too!
How to store the chocolate pop tarts?
You can store your homemade pop tarts for 2/3 days in an air-tight container at room temperature. We kept ours in the fridge for the same time only because we made them during a heatwave and they were completely fine.
Can I freeze these chocolate pop tarts’?
You absolutely can! If you don’t think you will use all of them or want to keep some on the side for when you feel like a sweet comfy breakfast, just wrap your chocolate pop tarts individually before baking, in foil or cling film and store them in a freezer-safe container.
You can freeze them individually or have them on a tray if you need more than one. When you are ready, pop them in the oven for around 20-25 minutes and enjoy!

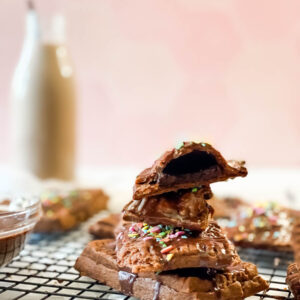
Homemade Chocolate Pop Tarts
Ingredients
For the pastry dough:
- 280 g all-purpose flour
- 50 g sugar
- ½ tsp salt
- 25 g cocoa powder
- 225 g unsalted butter cold from the fridge – cut into cubes
- 120 g sour cream
For the filling:
- 40 g chocolate chips
- 2 tbsp unsalted butter
- 2 tbsp heavy cream
- ½ tsp vanilla extract
- ¼ tsp salt
- 3 tbsp powdered sugar
For the wash:
- 1 egg
- 1 tsp water
For the glaze:
- 200 g powdered sugar
- 3 tbsp cocoa powder
- 3 tbsp milk
- 1 tbsp honey
- ¼ tbsp vanilla
- sprinkles
Instructions
- In the bowl of your standing mixer fitted with a dough hook attachment, combine the flour, cocoa powder, sugar, and salt. Proceed by incorporating cubes of cold from the fridge butter into the mixture until a crumbly consistency is achieved.
- Finally, add the sour cream and knead the pastry dough until it begins to cohesively come together.
- Once the dough is prepared, flatten it into a disc shape, wrap it with cling film and place it in the refrigerator for an hour. This step is essential to ensure the dough turns out crispy when baked.
- In the meantime, get the filling ready. Heat the butter, chocolate, and cream in a microwave-safe mixing bowl until smooth. Mix in the vanilla, salt and powdered sugar, combining all ingredients. Set aside the mixture to cool and thicken.
- When the pastry is done chilling, preheat the oven to 200C and line a tray with parchment paper or a baking mat.
- On a floured surface, roll out the dough to a thickness of 3 mm, then cut out rectangles measuring 6×10 cm and arrange half of them on the baking sheet.
- Prepare the egg wash by whisking together an egg and water, then brush this wash onto the surface of the rectangles on the baking sheet.
- You can now place a spoonful of the prepared filling in the centre of each rectangle. Top them up with the remaining rectangles and with the help of a fork, seal the two pieces together, then brush again with the egg wash. With a toothpick or knife tip, poke 8 holes in the surface of each pop tart.
- Keep assembling them until you finish all your pastry dough. When ready, bake them for 15 minutes, then let them cool completely on a cooling rack.
- While the pop tarts are baking, combine sugar, cocoa powder, milk, honey and vanilla in a mixing bowl to create the icing. Ensure the consistency is neither too runny nor thick by observing how it drips from a spoon.
- After completely cooling down the tarts, add a spoonful of icing on each of them, cover them up with sprinkles or your favourite toppings and let them harden before serving. Enjoy!
Notes
- you can keep the homemade chocolate pop tarts for three days at room temperature in an airtight container;
- you can warm up the chocolate pop tart in the microwave for 5-10 seconds;
- you can freeze the pop tarts, check the instructions above.
SHOP THE POST

Have you ever tried making homemade chocolate pop tarts? Have you ever tried any other pop tarts flavour? Let me know in the comments!
PIN THE HOMEMADE CHOCOLATE POP TARTS FOR LATER!


